UPDATE: Hey guys this tutorial has aged poorly when it comes to working with the newest version(s) of DL4J. The descriptive material found here is still fine (though dated). Here’s a small and quick update to get started.
ND4J, Canova & DL4J
I’m just going to take a quick moment to break down these three libraries and identify what they are. If you are interested in just getting started read ahead.
ND4J
ND4J is an N-dimensional Array scientific computing library for Java, meant to rival the offerings of the likes of numpy. According to the ND4J page, it can/will out perform numpy with the right back end. In short, it’s an easy to use API, that operates at high efficiency without ever being locked to one linear algebra library.
Back End?
That’s right, ND4J itself is a consolidation of well established and highly optimized BLAS (Basic Linear Algebra Subprograms) under a unified API. What does that mean for you? It means that you are able to switch to various Linear Algebra libraries without ever having to touch your code. It means you can port your code that runs on ND4J to the GPU with a simple swap in the maven configuration file (pom.xml, we’ll talk more about this later).
Visit the ND4J webpage for more information.
Canova
Canova exists to take raw data and convert it to many standardized vector formats which are easily loaded into Machine Learning pipelines. By raw data, we can think of images, sound, video, and so forth. This library is still under development, but serves as an important piece to the tripod of deep learning with Java.
DL4J
Deeplearning4j, or Deeplearning for Java, is a comprehensive deep learning offering for Java. It’s attempting to fill the role that Torch fills for LUA, or Theano for python. To compare these libraries directly may not be fair, given their different life spans, but it’s definitely a way to think about them. DL4J builds upon the ND4J offerings, this means that any algorithm in DL4J can be configured to utilize various BLAS backends. I.E. GPU support out of the box.
One of the more attractive features of DL4J is how configurable it is. Most if not all major Neural Network frameworks have been implemented, and their flexibility is what data scientists and machine learning enthusiasts dream of. What’s more, the networks can easily be piped into eachother with relative ease. Really, there is too much to talk about, and much of it I have yet to fully explore. So lets jump into getting set up, and after you can join me as I’ll continue to dig into this framework.
One last thing to note, if the ND4J backend scalability was not already attractive enough, DL4J offers context hooks for Hadoop and Spark. In what's described as, prototype locally, then scale your pipeline with Hadoop and/or Spark with little to no modifications. The library is built with distributed computing in mind.
Getting Started
Working with source
If you want to work with the source and make contributions, I suggest you follow the steps on the DL4J and ND4J webpages. This write up for now is going to focus on getting the library set up using the current Release Candidate(rc0) via the Maven Central Repository. I’ll either revise this section in the future or do another post for it. For additional help, make sure to stop by the gitter live chat: Live chat support.
Maven and the Command Prompt
The following is only if you wish to use maven within the command prompt.
If you want to install Dl4J with an IDE (eclipse), skip to the next section.
If you don’t fancy an IDE (which is quite crazy while working in java with a large tool such as DL4J), are more comfortable in the command prompt, or maybe monochrome is your thing. Don’t worry, I’ve got you covered. I’m writing this from a Windows user point of view, so keep that in mind as you continue to read.
1. Download Maven (What is Maven?)
First thing we are going to need to do is to head on over to the Apache Maven website and download for windows. I suggest the binaries .zip version. Make sure you have JDK 1.7 or higher!

Open and extract the .zip with your favorite [de]compression software, I use 7z.
2. Install Maven – Stable home
Grab the contents inside (the folder called “apache-maven-3.3.3”, though the version may be different), and move them to a secure location. I placed my Maven in my program files, but anywhere stable should do.
Note the location you've placed the folder in. For me I've located my maven at:
C:\Program Files\apache-maven-3.3.3
In the next part, I'm going to use that directory address, and go one folder deeper; into the bin.
C:\Program Files\apache-maven-3.3.3\bin

stability is the important part here
3. Install Maven – Windows Environment Variables
We’re almost good to go with maven in the command prompt! We just have to tell windows how to find maven and the JDK. To get to the environment variables either hit [window key] + [pause break] on your keyboard, similar to how you would [alt] + [tab]. Otherwise you can go to the Control Panel, then to System. Or as a third alternative you can paste the following without the quotes into any open folder window. “Control Panel\All Control Panel Items\System”

Okay, now that we here, simply click “Advance System Settings” on the left navigation bar.
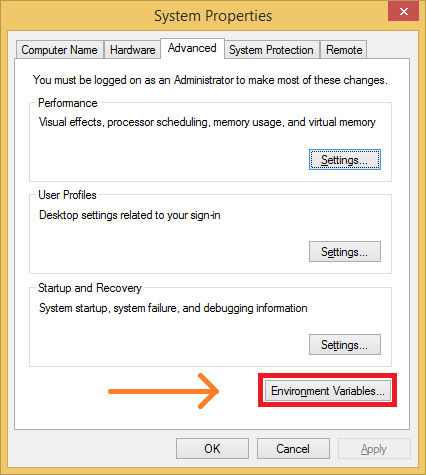
Click on Environment Variables
Edit PATH
If you have a PATH variable in the top box (environment variables), then edit it. Place a semicolon “;” after anything that exists in the Variable Value field. The new value you are adding is the folder path to the maven directory and into it’s bin.
C:\some\path; C:\location\to\apache\maven\bin

New Variable PATH
If you do not have the PATH variable, click New… and name the variable PATH. For the value field place the folder path to your maven directory’s bin folder. So referring to where I have placed mine it would be
C:\Program Files\apache-maven-3.3.3\bin

JAVA_HOME
Lastly, we need to tell windows where to find our JDK. Again my JDK is located in my program files, this may be different for you. Like the previous step for the PATH variable, if the JAVA_HOME variable does not exist, then click New.. and name the variable JAVA_HOME

The value should be the directory where the JDK is located.
4. Check If Maven is Installed
Open up the command prompt, cmd.exe. Then type “mvn -v”

Make sure you opened the command prompt up after making the changes to the Environment Variables
5. Maven and the POM
We are now ready to go! Choose a location on your computer to start your development. In the command prompt, get to the chosen directory. I.e. “c:\users\documents\development\deeplearning”
use the command cd <directory> to traverse
Create an empty file called “pom.xml” in your chosen directory. The pom file acts as a configuration file for Maven. Copy the contents of this example pom.xml into yours. Then in the command prompt call “mvn clean install”

And if all goes well…

From here on, you are good to go. I’d advise that you load the maven project into an IDE such as IntelliJ or Eclipse (the next section will talk about getting set up with Eclipse).
M2E and Eclipse
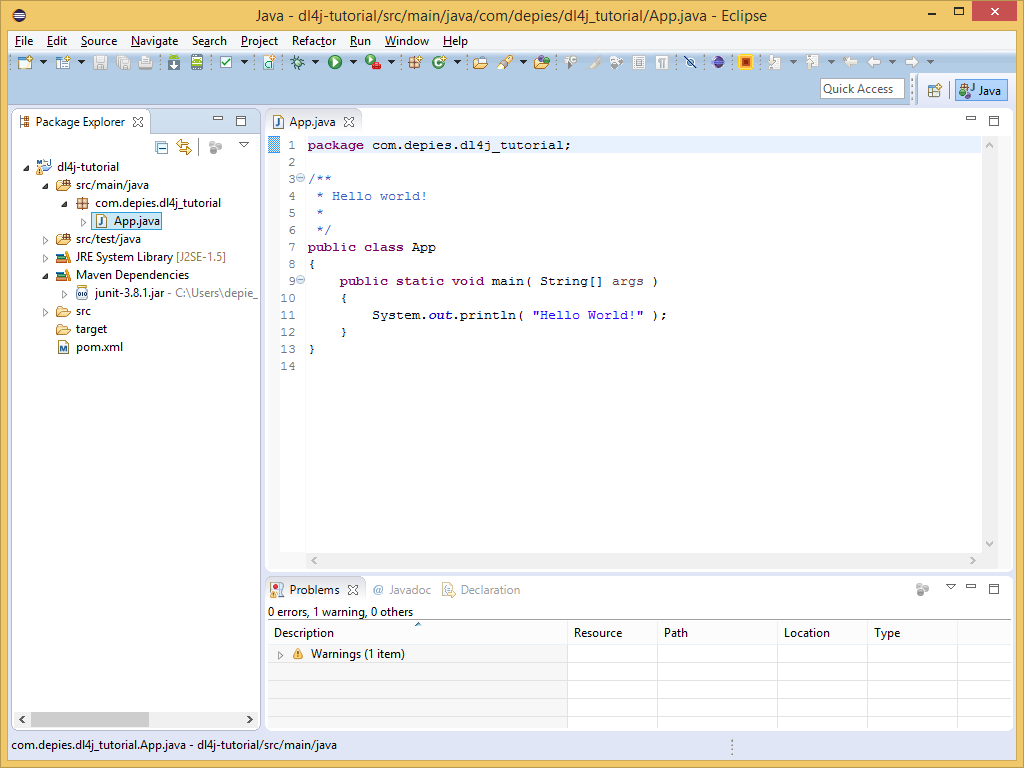
I’m writing this for Eclipse, and it’s maven plugin, M2E (Maven to Eclipse), as that is what I spend most of my time in. My understanding is that other IDE’s are very similar in process. The version of Eclipse at hand is Luna, though I am aware Mars has been released (blame my slowness to transition on my work environment!).
The following is going to consist primarily of images demonstrating the series of steps needed. Occasional commentary will accompany the images.
1. Getting Started w/ Eclipse
Select a workspace to begin working in.

Once eclipse loads up we should see this screen.

2. New Maven Project
Right click on the empty package explore area and chose new -> Other…

Open the Maven folder and select Maven Project.

Click next until you reach the page below. Fill out the group id and artifact id. Feel free to do exactly as below, or tailor to a more serious naming convention.

Click finish. We now have a new Maven Project. This is more or less equivalent to just creating a pom.xml file in the command prompt section.
Editing the pom.xml
We want to open the pom.xml file and click on the pom.xml tab once the file is open. The go to this example pom.xml and copy the contents into your pom file (overwrite what exists there).

In doing this, we are overwriting what we chose for our group-id and artifact-id.
We can either go back and replace it, be more careful with the copy/paste, or just ignore
it for now.
Now you’ll notice we have an error in our problems tab.

Have no fear, we simply just need to right click on our project, Maven –> Update Project


And there we go! We’re all set up with DL4J, ND4J and Canova!

Closing Comments
In the next tutorial we will go over the POM in more detail. This should be enough to get you started and set up with these three libraries. I’m also going to start a series implementing fairly routine Machine Learning Algorithms to help explore the various features of ND4J, Canova and DL4J.
Lastly, leave a comment if you have any questions, suggestions or requests. You can follow me on the tweet-verse @depiesml.

[…] user/practitioner. More specifically, we are going to examine the pom.xml we set up in our “Getting Started with DL4J” post. Lets get […]
LikeLike
[…] DL4J (Deeplearning for Java) – Getting Started […]
LikeLike
[…] If you haven’t set up Deeplearning4j, check out this tutorial first! […]
LikeLike
Was just looking for a website something like yours. Thanks.
(You could check my blog on http://iotenthu.com, where I share ideas, links, observations on the web etc)
LikeLike
[…] After successfully installing the m2e plugin for eclipse, simply follow this guide to finish setting up DL4J: https://depiesml.wordpress.com/2015/08/26/dl4j-gettingstarted/ […]
LikeLike
[…] Eclipse 설치 방법 – https://depiesml.wordpress.com/2015/08/26/dl4j-gettingstarted/ […]
LikeLike
Thanks for this useful description. However things don’t work me as given here: “mvn clean install” produces these errors. Any idea?
[ERROR] The project org.deeplearning4j:deeplearning4j-examples-parent:0.7-SNAPSHOT (C:\Users\bjasl\workspace\dl4j-tutorial\pom.xml) has 6 errors
[ERROR] Child module C:\Users\bjasl\workspace\dl4j-tutorial\dl4j-examples of C:\Users\bjasl\workspace\dl4j-tutorial\pom.xml does not exist
[ERROR] Child module C:\Users\bjasl\workspace\dl4j-tutorial\dl4j-spark-examples of C:\Users\bjasl\workspace\dl4j-tutorial\pom.xml does not exist
[ERROR] Child module C:\Users\bjasl\workspace\dl4j-tutorial\datavec-examples of C:\Users\bjasl\workspace\dl4j-tutorial\pom.xml does not exist
[ERROR] Child module C:\Users\bjasl\workspace\dl4j-tutorial\dl4j-cuda-specific-examples of C:\Users\bjasl\workspace\dl4j-tutorial\pom.xml does not exist
[ERROR] Child module C:\Users\bjasl\workspace\dl4j-tutorial\nd4j-examples of C:\Users\bjasl\workspace\dl4j-tutorial\pom.xml does not exist
[ERROR] Child module C:\Users\bjasl\workspace\dl4j-tutorial\rl4j-examples of C:\Users\bjasl\workspace\dl4j-tutorial\pom.xml does not exist
[
LikeLiked by 1 person
[…] 按照教程安装Maven,该教程讲述非常详细 […]
LikeLike
Exception in thread “main” java.lang.NoClassDefFoundError: org/nd4j/shade/jackson/core/JsonProcessingException
at org.deeplearning4j.models.sequencevectors.SequenceVectors$Builder.(SequenceVectors.java:396)
at org.deeplearning4j.models.word2vec.Word2Vec$Builder.(Word2Vec.java:89)
at com.roboo.news.badgood.webspam.similarity.Word2VecSim.buildWord2VecModel(Word2VecSim.java:31)
at com.roboo.news.badgood.webspam.similarity.Word2VecSim.main(Word2VecSim.java:49)
Caused by: java.lang.ClassNotFoundException: org.nd4j.shade.jackson.core.JsonProcessingException
at java.net.URLClassLoader$1.run(URLClassLoader.java:366)
at java.net.URLClassLoader$1.run(URLClassLoader.java:355)
at java.security.AccessController.doPrivileged(Native Method)
at java.net.URLClassLoader.findClass(URLClassLoader.java:354)
at java.lang.ClassLoader.loadClass(ClassLoader.java:425)
at sun.misc.Launcher$AppClassLoader.loadClass(Launcher.java:308)
at java.lang.ClassLoader.loadClass(ClassLoader.java:358)
… 4 more
LikeLike
After completing all the steps I found no .jar file in maven dependency.
LikeLike
Thank you for your great document. It is very helpful for me.
To work the instruction correctly for Eclipse Mars and Maven 3.5.0, I modified your pom.xml slightly. I moved element to under element. Then, it worked at my environment.
LikeLike
i followed your directions (i think) ans got as far as: “And there we go! We’re all set up with DL4J, ND4J and Canova!”
but i do not have any maven dependencies. using Neon.2 Release (4.6.2)
thanks
LikeLike
Could you clarify – what you mean you do not have any maven dependencies?
LikeLike